

I used the tutorial for a Car Seat Canopy from While They Sleep, but since the canopy is basically two yard long rectangles sewn together with ribbon or self-fabric ties affixing it to the handle I thought that would be pretty boring in a plain pink. I decided I would venture into the world of Machine Applique just to spice things up a wee bit. I'm definitely no expert at machine applique since this is my first time, but I did quite a bit of research and came up with my own method using things I had on hand. I thought I'd share my new knowledge with you since I'm so happy with the results!
Simple Machine Applique Tutorial
Items Needed
- A Sewing Machine
- Background project that needs a little spicing up
- Fabric scraps
- Fusible Interfacing
- Fusible Stabilizer
- Iron and Ironing Board
- Template for the applique (I used a birdie from the Canvas Bird Art Tutorial)
- Fabric Pencil
- Scissors
- Seam Ripper
- Take a few fabric scraps and play with your machine's settings until you have a fairly tight zigzag stitch. I was going to be using a tightly woven quilting weight woven cotton for my applique so I knew I wanted the stitches close together to prevent fraying and just long enough to cover the edges about 1/8". On my Viking Emerald 116, my settings were as follows:
Stitch Selected: 2-a plain zigzag
Presser Foot Tension: 3
Thread Tension: 4
Width: 2.5
Length: at about .3 if I were to guess since it's over in the buttonhole stitch area - Practice. You don't want to mess up your actual applique so take a few minutes to practice turning convex and concave curves as well as some inside and outside corners. You'll find you need to lift the presser foot and pivot slightly as your turn the curves.
 (Here's my practice)
To make the stitching smooth I found that on convex curves and outside corners, you want to pivot with the needle down on the outside of the zigzag. (Needle down and one the outside swing of the zig zag. Here I've pivoted and am about to lower the presser foot)
For concave curves and inside corners, you'll want to pivot the project with the needle down on the inside of the zigzag. (The needle is on the inside of the zigzag as you lift the presser foot and turn though this example is harder to see than the outside corner)
 - Fuse the interfacing to your fabric scraps and then trace your template onto the scrap. Cut out your shapes.
 (Fabric scraps reinforced with interfacing and cut after tracing my template)
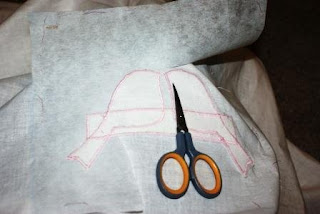
 - Cut out a piece of fusible stabilizer that is larger than your finished applique. Using a long straight stitch baste the stabilizer to the back of your background project. The fusible side of the stabilizer should be facing the back side of your background fabric.
- Pin your first applique piece ontop of the right side of your background fabric. The stablizer will be on the back side underneath where you pinned.
- Applique your first piece and then continue with the remainder of the applique.
- Rip the basting stitches from the fusible stabilizer. Trim the stabilizer along the edges of your stitching being careful not to cut the background fabric.
- Fuse the stablizer to the fabric using your iron. Assemble and complete your project and enjoy your foray into machine applique!


1 comment:
Very cute my darling.
Post a Comment