
Supplies
- Starch (I'm addicted to starch. It makes so many quilting projects easier!)
- Iron
- Rotary Cutter and Mat
- Scraps (Mine were from 1.5" Honey Bun Scraps)
- Printer and Paper
- Hand Quilting Thread
- Scissors (for paper and for cutting thread)
- Hand Needle
- Thimble
- Pins
- Starch and press your scraps. Un-startched scraps are harder to fold accuratly over the paper templates... ask me how I know...
- Cut into squares. Since I used a Honeybun, my squares were 1.5". I would recommend doing a bigger size for your first hexagons. These were a wee bit tedious...
- Go to this site and print hexagonal graph paper in your desired size. Your finished hexagon width should be .5 inches smaller than the squares you cut. So for my 1.5" squares I wanted hexagons that were 1" at their widest. Divide your desired width in half and you have the width of the hexagon sides. My sides were .5"
- Cut out your paper hexagons and pin in the center of your fabric square. I trimmed around the corners of my squares to make the shape slightly more hexagonal.
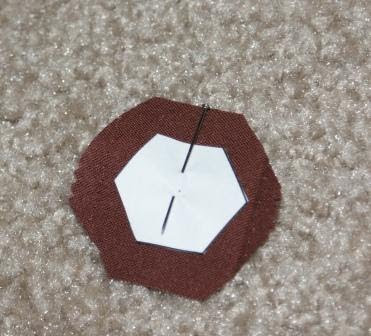
- Fold over one of the edges of fabric along the line of your paper template. Be very careful not to bend your template.

- Fold over an adjacent edge to make a sharp corner. Again be careful about not folding your template hexagon.

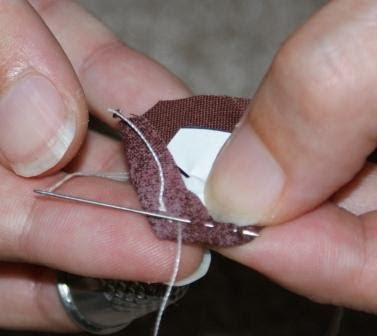
- Put your needle through one of the folded sides and bring it out close to the corner. Use 1 or 2 whipstiches to tightly tack down the corner. DO NOT sew through the paper template.

- Fold down the next corner. Use a running stitch (don't go through the paper) to get to the next corner. Whipstitch that corner down.
- Continue this process for the other corners. Tie off your thread. The back of your hexagon will look like the picture. Since you did not through the front of the hexagon or the paper template, you will be able to remove the paper (and reuse it if you like!) and not have to remove these basting stitches when you begin sewing the hexagons together.

- Once you have made 7 hexagons you can sew them together to make a "flower". Here are the seven pieces I picked out for mine.

- Take the center and one petal and hold them together along one side. Knot a thread and run it through the back of one hexagon. Whipstitch your hexagons together at the corner.

- Continue whip stitching along that side to the next corner. Be careful not to sew through your paper templates!

- Add additional petals sewing them both to each other and the flower center as you go.

- When you've finished whip stitching your flower together, insert a needle gently into the paper at the flower center.

- Carefully pop out the hexagonal piece of paper. If you've not sewn through it, you can use your template again!

- Here's my finished hexagon flower! You can arrange these in a million ways to make your quilt top or decorate a project by appliqueing the flowers.


 P.S. Didn't my husband do an awesome job on the photography for this tutorial?! I'm so proud of him!
2 comments:
I love it! Your tutorial was good! and the photos too!
What I am wondering, are you doing your templates yourself?
Ann-Christin in Sweden
http://ann-christin.zoomin.se/A98943
I printed the templates using the hexagonal graph paper from here http://incompetech.com/graphpaper/hexagonal/ and cut them out myself. Good luck!
Post a Comment